DLite is an Open Source Low-Code platform that is designed to help building web front-ends. It is based on Web standards, such as the Vue.js reactive framework, and Bootstrap, the popular UI kit for responsive web design. In short, the core of DLite is a wrapper around BootstrapVue, including basic low-code components such as inputs, and more advanced components such as tables. Also, DLite comes with additional low-code components such as graphs (a chart.js wrapper), and many layout components such as containers, splitters (a split.js wrapper), tabs, and many others.
DLite’s comes with the following Open Source key elements:
- Many low-code components to build UIs fast;
- Model-driven tools, such as a model editor (which can create models inferred from a JSON structure), and builders, which can automatically create full forms and CRUD editors out of a model;
- A local-first API and service (including an Open Source server for a sync service);
- A builtin probe to measure consumed resources (in order to help with responsible software development and eco-design).
In this post, I will explain how these 4 key elements work. The source code for all these is available here.
Low-code components
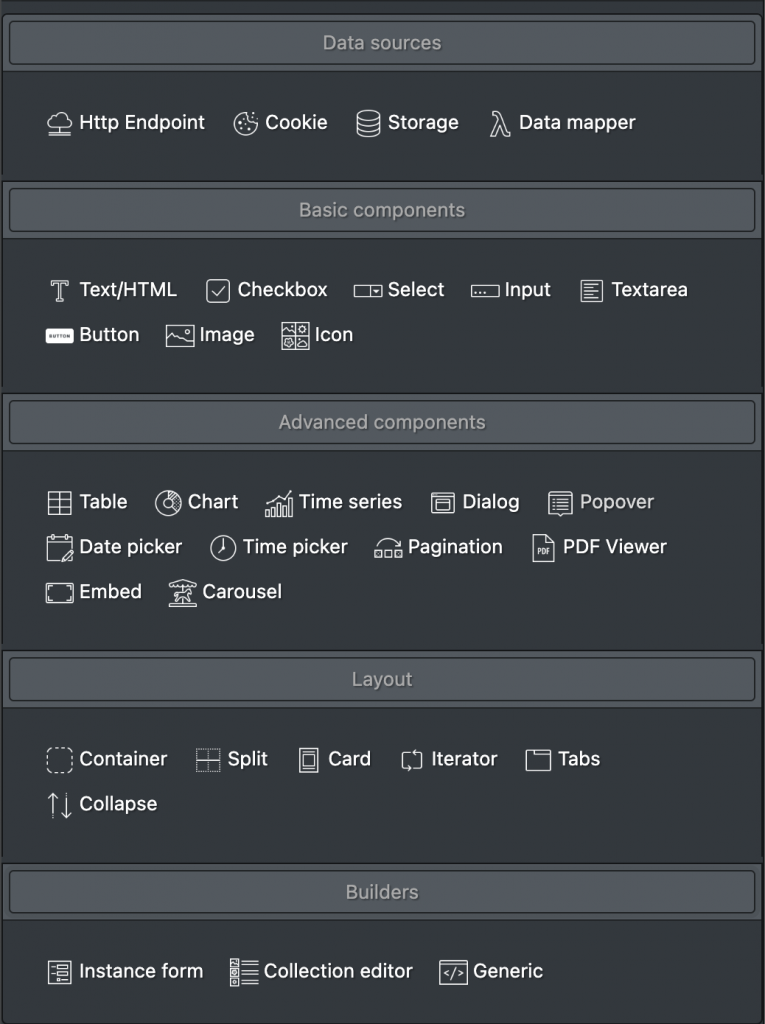
In DLite, components are dragged-and-dropped and assembled inside an application. Several Open Source components are available. Most of them are wrappers for existing Open Source components and libraries. DLite defines some categories depending on the component’s purpose. For instance, the Data sources category gathers components that are specialized at manipulating data, and don’t have any corresponding UI. The Builders category is a special case that will be explained in the next section.
The set of configured/assembled components form the application model, which can then be exported as an application file (*.dlite file) and be reloaded inside the platform any time to be edited and/or executed as a web app. Basically, a component is formed out of the 3 key elements:
- A view model, which defines all the property values of the component, (including builtin
typeandcidproperties). The view model is included in the app model and is saved as is in the *.dlite model file. Within a given app, each component has a default id, defined in thecidread-only property. Within a DLite app, one can use the$v(...)global function to access the view of a given component. For instance,$v('input-0')returns the view model of an HTML input component called'input-0'. - A data model, which holds the data of the component. On contrary to the view model, which defines the static part of the component, the data model is dynamically changed during the application execution. DLite component are reactive, which means that any change on the data model will be automatically and instantly reflected to the component’s UI. Note that every component defines a
dataSourceproperty, which can refer to another component, in oder to share data across components. The data model of a component can be accessed with the global$d(...)function. - A UI component, which is the actual Vue.js implementation of the component, and can be retrieved with the
$c(...)function. Each component defines actions that can be invoked to interact with the component. For instance,$c('input-0').setData('hello')will set the value (data model) ofinput-0to'hello'.
In DLite, each property can be a literal (constant) value, or a JavaScript formula. A JavaScript formula will allow the evaluation of the property values dynamically. For instance, the hidden property may become true upon a formula that depends on another component data model: $d('input-0') === 'abc'.
Additionally to properties and actions, each component defines a set of event handlers, that can trigger actions. For instance, a button defines a @click event handler. An action to open a modal can be expressed with the following formula: $c('dialog-2').show().
In order to express formulas as quickly and simply as possible, DLite defines an API, which can be used from any component. Details about this API can be found on GitHub.
Model-driven builders
Assembling components together to build UIs can be a repetitive and error-prone task. In order to facilitate the development of new apps, DLite comes with so-called builders, which are some sort of wizards that produce already-assembled component sets. Builders are mostly domain-driven, meaning that you need to define a model for the entities (classes) of your domain. Once you have defined classes with well-typed properties, you can use a builder to generate an edition form for a given class instance, or even to produce a full CRUD UI for a collection of class instances.
With DLite, you can create models manually, using the Model Editor tool (Main menu > Tools > Model Editor), but you can also provide an example of the JSON you want to build your model for. When providing a JSON example, DLite will parse the JSON and automatically infer all the classes that are meant to be used in the model. All you have to do after having your model inferred is to make tiny adjustments (such as finding the appropriate names for your classes, adjusting some property types, removing useless classes, etc.), and use one of the builders to generate a pre-assembled UI to reflect/edit your model.
In order to illustrate the model inference feature, we can use the “super hero squad” example given by Mozilla here.
 {
   "squadName": "Super hero squad",
   "homeTown": "Metro City",
   "formed": 2016,
   "secretBase": "Super tower",
   "active": true,
   "members": [
     {
       "name": "Molecule Man",
       "age": 29,
       "secretIdentity": "Dan Jukes",
       "powers": [
         "Radiation resistance",
         "Turning tiny",
         "Radiation blast"
       ]
     },
     {
       "name": "Madame Uppercut",
       "age": 39,
       "secretIdentity": "Jane Wilson",
       "powers": [
         "Million tonne punch",
         "Damage resistance",
         "Superhuman reflexes"
       ]
     },
     {
       "name": "Eternal Flame",
       "age": 1000000,
       "secretIdentity": "Unknown",
       "powers": [
         "Immortality",
         "Heat Immunity",
         "Inferno",
         "Teleportation",
         "Interdimensional travel"
       ]
     }
   ]
 }
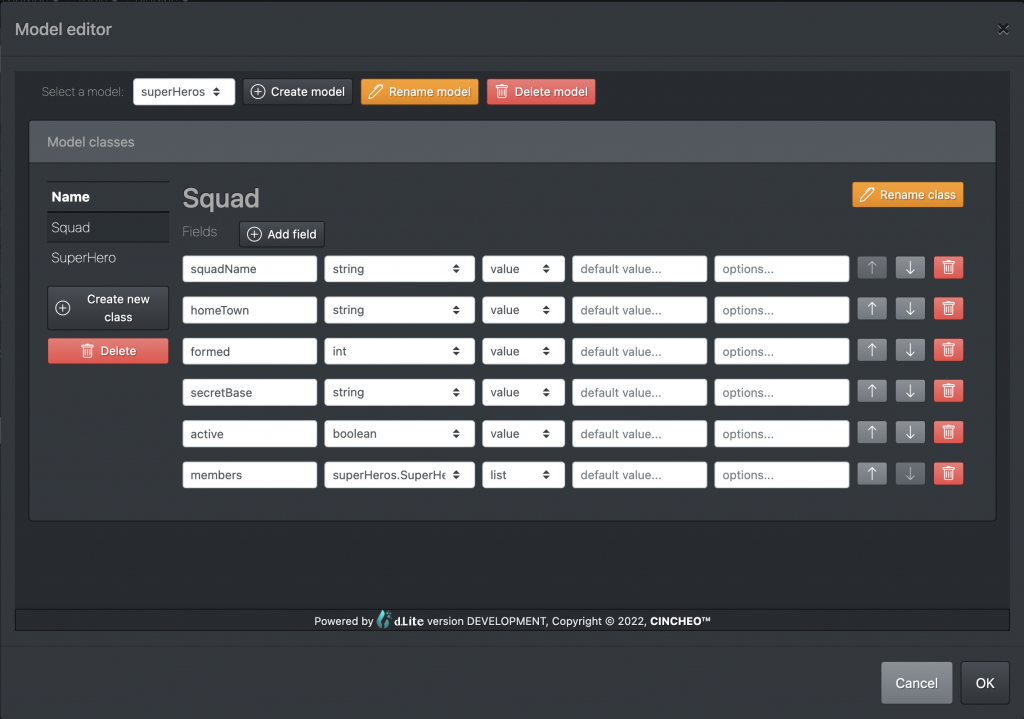
Such a JSON could typically be returned by an API to which you want to plug your frontend to. To create a model out of it, just click “Main menu > Tools > Model Editor”, then click the “Create model” button and copy paste the JSON into the “JSON model instance” field. You’ll get the following model:
(It is worth noticing that the DLite Model Editor tool is itself a DLite app, which is embedded in the main IDE with an iframe… Such a Micro-Frontend approach can be used in your apps when building complex apps with DLite.)
Once you are happy with your model, use the “Form builder” (in the “Builders” section) to create a form in your application, and bind the data source of the container to a local storage connector for instance. You can also bind the source to the result of an HTTP endpoint to fetch the data from a server.
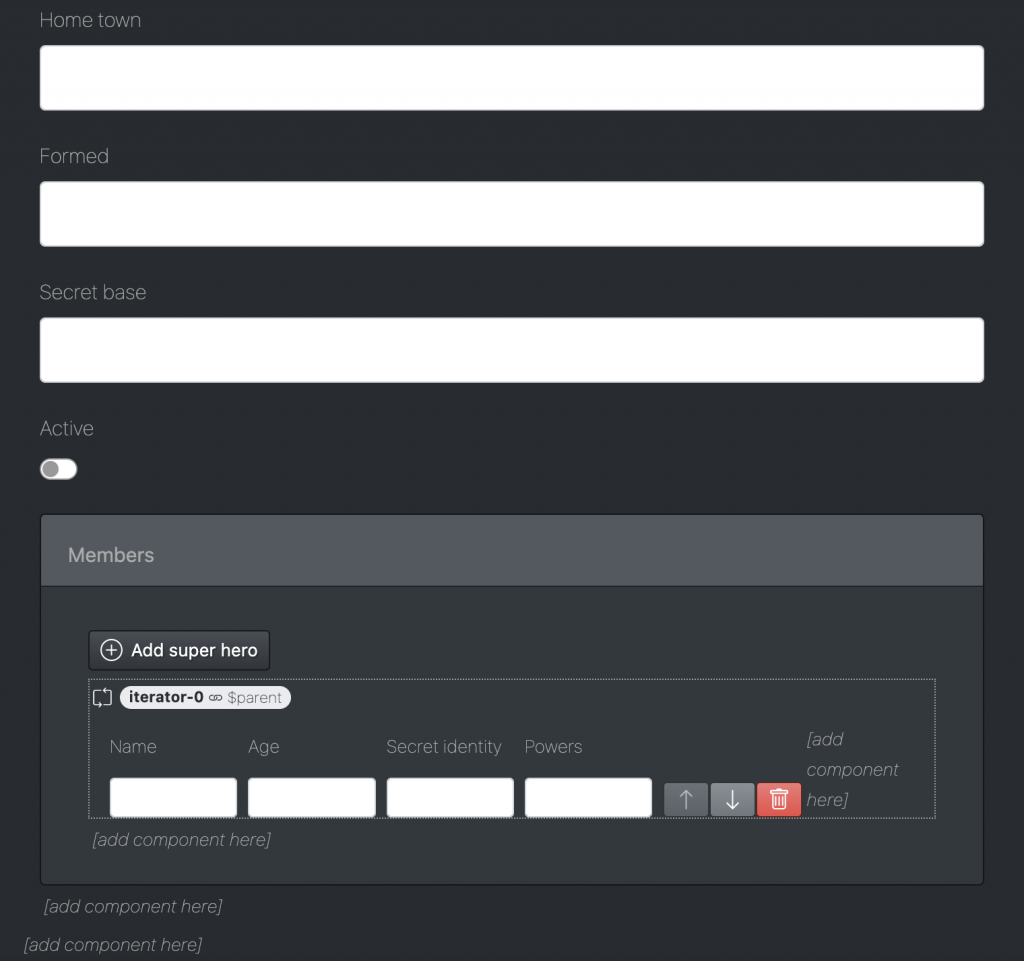
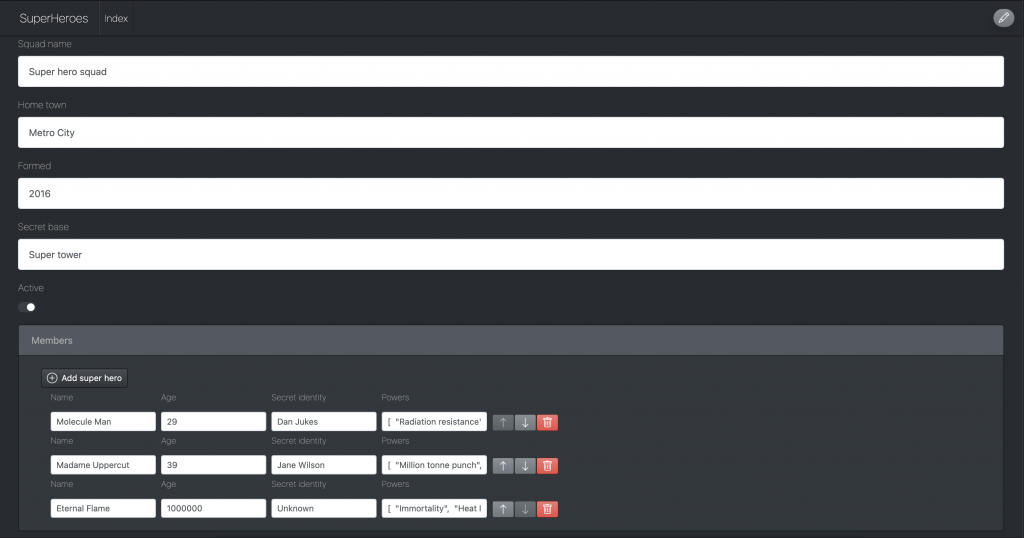
An important point is that the generated form is fully editable, meaning that you can change the order, the styles, the names and behaviors of the components at will. There is no constraints between the generated UI and the model that was used to generate it, in order to ensure maximum flexibility. The screenshot here after shows the default interface (generated with the default style). This interface can be edited like any DLite UI.
Local-first synchronization API
As I explained in another post, local-first is a good friend for the low-code approach. Local-first is a development paradigm that consists of developing the application like if it was a local single-user application. It makes the development much easier, since (1) you don’t have to take care of the access rights or privacy issues, and (2) you don’t need a specific backend.
Not having to rely on a specific backend with a specific API is a key point. Indeed, creating a web app with a low-code tool such as DLite allows you to build your front end fast. However, a bottleneck might be to create, secure, and deploy a specific API for your application. In an enterprise context, you will have to conform to various constraints imposed by your IT services, which can kill your development efficiency.
By using a local-first synchronization API, one can deploy an application that works offline on a local storage. Each user will have its own space on the sync server. When connected, the sync protocol will ensure that the users’ datas are kept in sync and can be shared across multiple devices (so that users never loose data). Also, DLite’s local-first API allows users to share selected data to other users (similarly to giving access to your documents within a collaborative cloud drive/editor). The sharing protocole opens the door to develop collaborative apps that can respect the privacy and control of each user, since each user can be kept in the decision loop and decide with whom some data might be shared. Note that this paradigm is compatible with enterprise applications, but is entails to use some data sharing patterns.
The full JavaScript sync client source code is available here, and the sync server API source code is available here. Also, within a DLite app, the entry point for the sync API is the $collab global object.
| Target | Function | Description |
|---|---|---|
$collab | synchronize() | Synchronize all the data to the server for the current user |
$collab | share(key, targetUserId) | Share a data with another user |
$collab | unshare(key, targetUserId) | Cancel the sharing of a data with another user |
$collab | sendMail(targetUserId, subject, message) | Send an email |
$collab | clearSyncDescriptor(key = undefined) | Clear the local data (will be synced again from the server) |
$collab | deleteRemote(key) | Delete a data, locally and remotely on the server |
$collab | logInWithCredentials(login, password) | Log in |
$collab | getLoggedUser() | Get the logged user object |
$collab | logOut() | Log out |
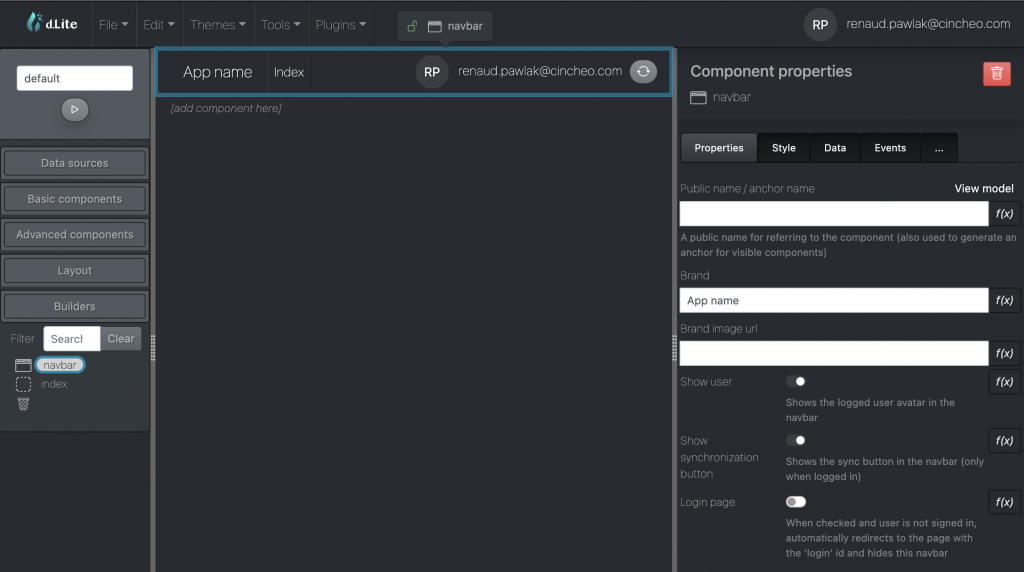
DLite provides builtin access to this API, so that DLite programmers can enable authentication and synchronization without having to write a line of code. It is the main navbar component that holds the configuration, as shown right after.

Support for eco-design
It is common belief that low-code is not a good tool for eco-design, since it adds a layer of abstraction that is necessarily resource-consuming.
However, like I explained it with more details in that post, things are not that simple and sometimes counter-intuitive when it comes to eco-design and maximizing efficiency. For instance, when developing a data science application, you’d probably better use Python than C++, although C++ is a much more energy-efficient programming language (see here for the details). In other words, you have to use the right tool for the right purpose: do not use a screw driver if you have to nail.
As a direct consequence, low-code tools, if used for the right use cases, can be better than recoding from scratch a new application in Java or C++. In addition, because you will only write the code that matters, you will develop faster and be able to understand on what aspects you can win efficiency.
DLite is a low-code tool that enables several approaches to data management: typical client-server (remote specific API) or local-first (local and generic syncing). Having several approaches available for different use cases is the key to saving resources and implement eco-design, because the best approach to select is never a universal choice, but it always depend on how the application is used (usage is the key).
Using a local-first or a regular client/server approach is a complex decision problem that requires having a clear mental picture of your user’s needs (and data life-cycle). But also, it requires a clear vision of how much a decision cost, in terms of resources. Without such a vision, for a developer, it is like drawing a picture for a blind person, or composing an Opera when being deaf.
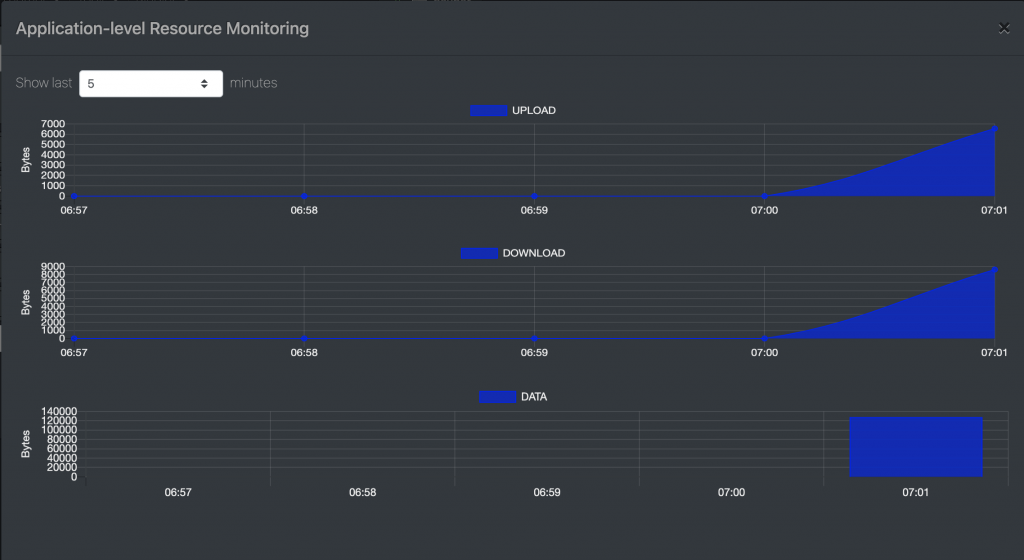
This is why DLite embeds a native resource monitoring tool, which allows the developers to be constantly aware of how much resources the application is using.
In order to activate the resource monitoring tool for the application’s user, just check the “Show resource monitoring” checkbox of the navbar. A button (![]() ) will be added to open the resource monitoring tool window.
) will be added to open the resource monitoring tool window.
In the current version, the tool monitors the following application-level resources:
- The downloaded data (when syncing, or when calling REST APIs)
- The uploaded data (when syncing, or when calling REST APIs)
- The used data storage
Conclusion
In this post, I have explained the most important features of the DLite low-code platform and give clues on how they work or can be used.
DLite stands out because it is focused on Eco-Design. The local-first paradigm with some built-in monitoring tools will help the developers making the right decisions to maximize software efficiency and twist the CAP theorem (as explained here).
Many improvements will be done in the future, such as supporting CRDTs and other tools that help eco-design. We are just at the beginning of the road 🙂
DLite is Open Source. Anyone can use it and install it for free 🙂
Contact: info@cincheo.com